
The Sales Items setup page allows you to create, view, and edit items for use in Point of Sale. You will need to create each Sales Item before it can become available at the Point of Sale (POS). When you open the Sales Items page, you will see a Search form as shown below:
We'll return to this form in a moment; for now, click Add New to create a new Sales Item.
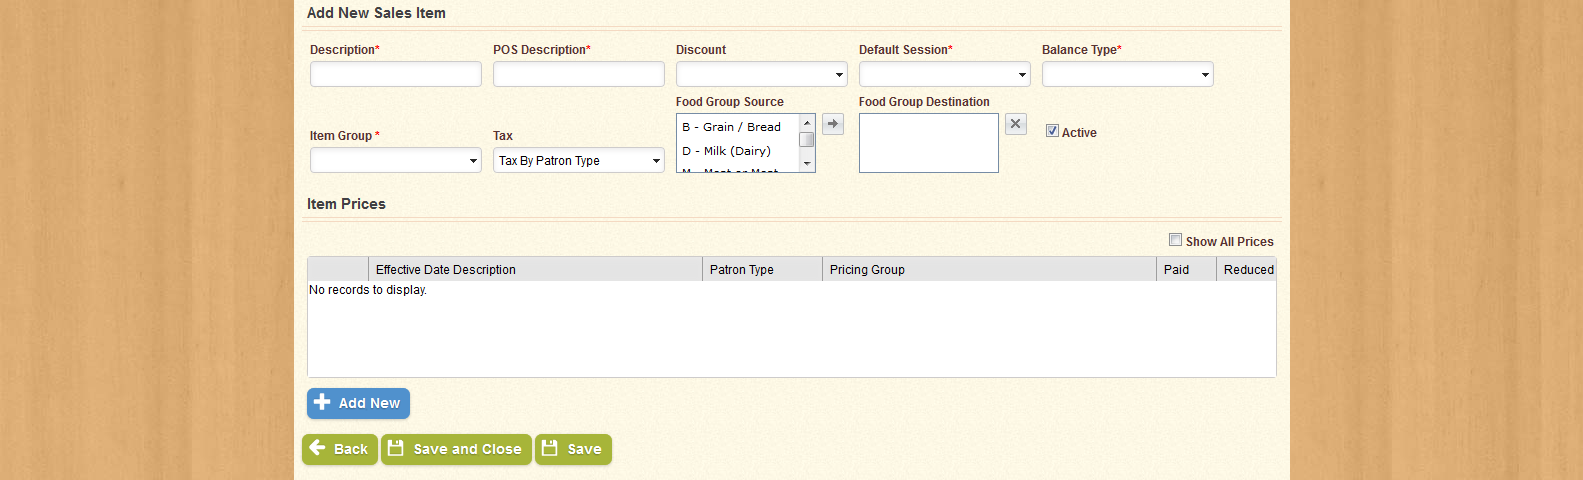
There are two sections on this screen: Add New Sales Item and Item Prices.
Fill in the required fields, add one or more Item Prices, and click Save to create the item. Click Save and Close to return to the Search form, or click Back to return to the Search form without saving. When you have saved the item, a new button called Advanced will appear at the bottom of this screen.

In the Add New Sales Item section, fill in the required fields and any other fields you wish to fill in. If you want the item to be available at the POS, be sure to check the box to make the item Active. Assigning one or more Food Group Sources will also help during Menu Planning.
| Important! | Fields marked with * are required; you will not be able to continue until all required fields have been filled. |
| Field Name | Description |
|---|---|
| Description | The name of the sale item as it will appear on most lists. |
| Item POS Description | The name of the item as it will appear on the Point of Sale screen. |
| Discount | The discount that will be applied automatically to the selected item. |
| Default Session | The meal session that will be applied to the selected item if no session type is selected. |
| Balance Type | The balance from which the item's value will be debited. |
| Item Group | The group to which the selected item belongs. |
| Tax | Indicates whether or not taxes will be applied to the selected item. |
| Food Group | The food group, or food groups, that will be applied to the selected item for the purposes of nutrition and menu planning. |
| Active | Check this box to make the item active, or leave it unchecked to make the item inactive. |

Next, you will want to assign an Item Price. In the Item Prices section, there is a list - currently an empty list - where the available prices are displayed.
Add as many Item Prices as needed; when you have created all of the information for the sales item, click Save and Close to create the item and return to the Search form, or Save to create the item and remain on this page. If you click Save, a new button, Advanced, will appear on the bottom right of the screen.
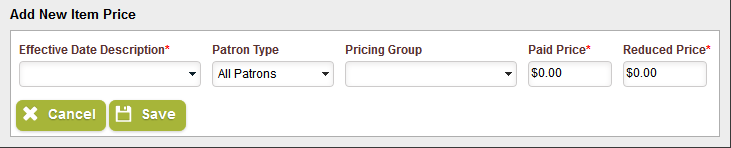
Click the Add New button to open the Add New Sales Item Price window.
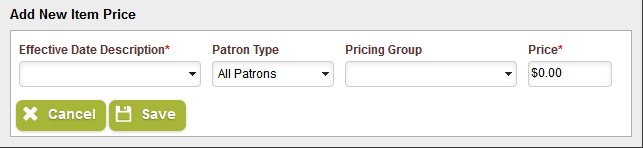
Choose an Effective Date, Paid Price, and Reduced Price. You can also create additional item pricing for specific Patron Types and Pricing Groups, which will create different pricing for different situations. If you want an item to be priced differently for different groups, be sure to create a separate Item Price for each group. Note that an Item Price with an Effective Date which is inactive will not show up in the Item Prices list unless the "Show All Prices" is checked.
When you have filled in the fields as needed, click Save to add the Item Price to the list, or Cancel to close the window without saving.
| Important! | Fields marked with * are required; you will not be able to continue until all required fields have been filled. |

In the Item Prices section, click the  icon to edit an existing Item Price. Clicking the Edit icon will open the Edit Sales Item Price window. This window functions the same way as Add New Sales Item Price; make the necessary changes, and then click Save to retain the changes or Cancel to close the window without saving.
| Field Name | Description |
|---|---|
| Effective Date Description | The name of the date range that will be used for the selected item. |
| Patron Type | The patron type to which the selected item price will apply. |
| Pricing Group | The patron group for which the selected Item Price will be applied. |
| Paid | The price of the selected item for patrons whose eligibility type is Paid. |
| Reduced | The price of the selected item for patrons whose eligibility type is Reduced. |
|
|
Open the Edit window for the selected item. |

|
Delete the selected item. A confirmation prompt will appear. |
Now, let's return to the Search Form.
Use the fields provided to narrow your search by Description, Item POS Description, and Item Group. You can also use the check-box provided to display Inactive items as well as Active ones.
Click Search to generate a list of results based on the information you provided. The list appears as shown below:
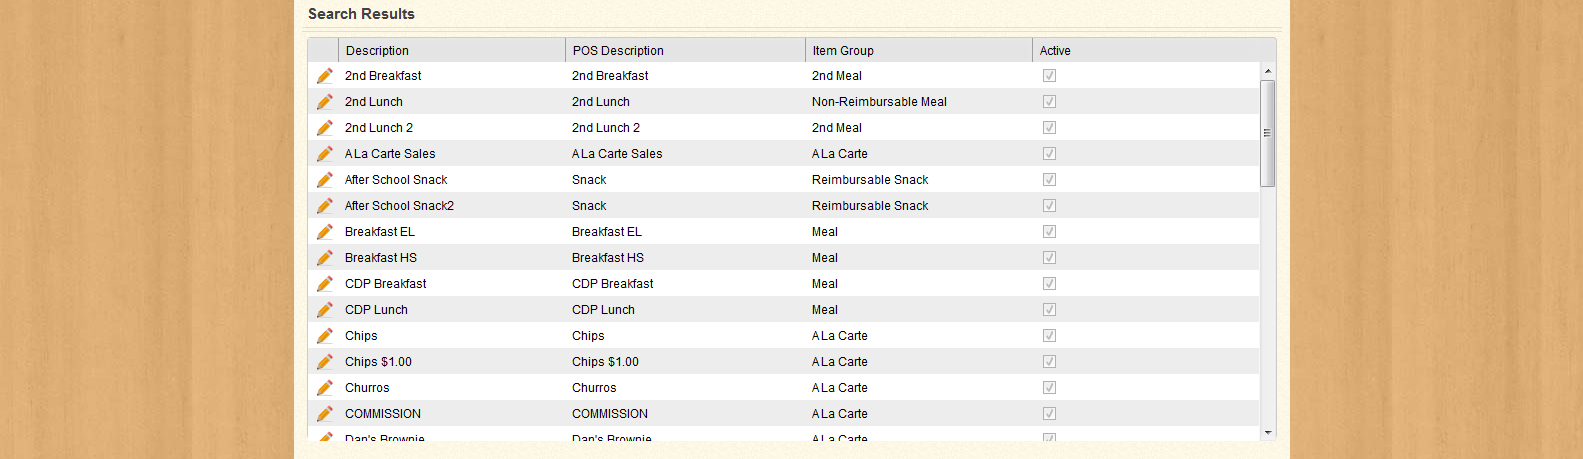
You can sort the list by Description, POS Description, Item Group, and whether or not the item is Active by clicking the column headers. Note that only the first one-hundred results will be displayed if your search terms are broad. You can also use the icon in the first column of each row to edit the item in that row.
Clicking the Edit icon will open the Edit Sales Item screen, as shown below:
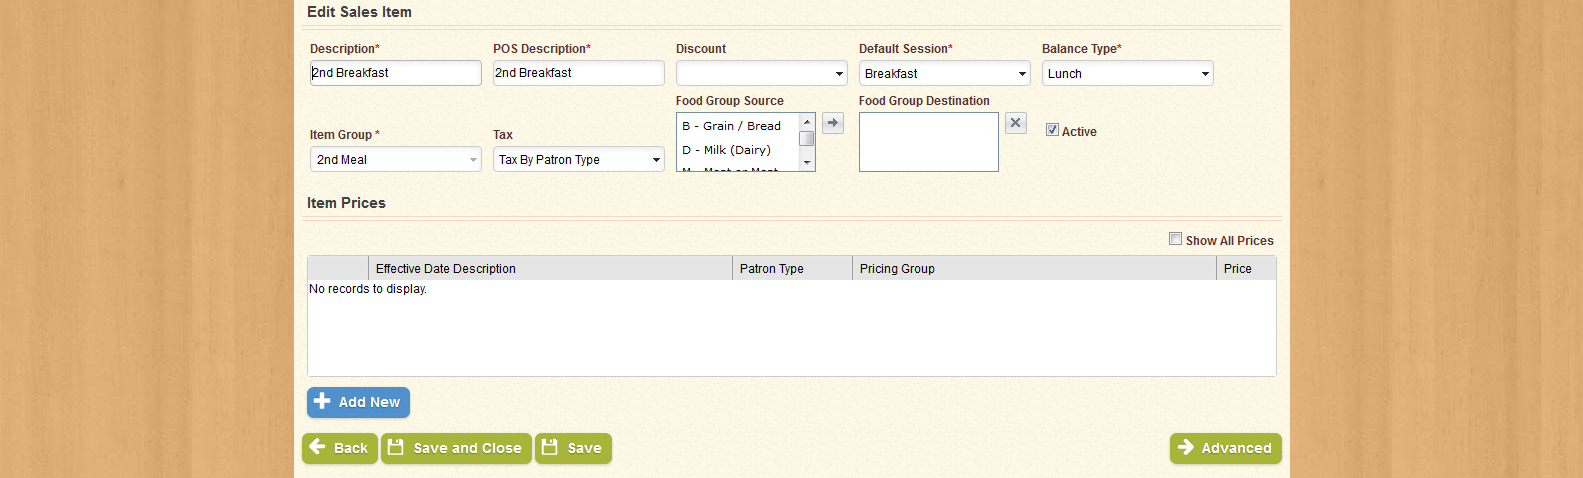
Make any desired changes to the fields provided, add one or more Item Prices, and click Save to keep the changes you've made. Click Save and Close to return to the Search form, or click Back to return to the Search form without saving. You can also click Advanced to access additional settings for the Sales Item; these settings are described in greater detail below.

In the Edit Sales Item section, fill in the required fields and any other fields you wish to fill in. If you want the item to be available at the POS, be sure to check the box to make the item Active. Assigning one or more Food Group Sources will also help during Menu Planning.
| Important! | Fields marked with * are required; you will not be able to continue until all required fields have been filled. |
| Field Name | Description |
|---|---|
| Description | The name of the sale item as it will appear on most lists. |
| Item POS Description | The name of the item as it will appear on the Point of Sale screen. |
| Discount | The discount that will be applied automatically to the selected item. |
| Default Session | The meal session that will be applied to the selected item if no session type is selected. |
| Balance Type | The balance from which the item's value will be debited. |
| Item Group | The group to which the selected item belongs. |
| Tax | Indicates whether or not taxes will be applied to the selected item. |
| Food Group | The food group, or food groups, that will be applied to the selected item for the purposes of nutrition and menu planning. |
| Active | Check this box to make the item active, or leave it unchecked to make the item inactive. |

Next, you will want to assign one or more Item Prices. In the Item Prices section, there is a list - currently an empty list - where the available prices are displayed.
Add as many Item Prices as needed; when you have created all of the information for the sales item, click Save and Close to create the item and return to the Search form, or Save to create the item and remain on this page. If you click Save, a new button, Advanced, will appear on the bottom right of the screen.
Click the Add New button to open the Add New Sales Item Price window.
Choose an Effective Date, Paid Price, and Reduced Price. You can also create additional item pricing for specific Patron Types and Pricing Groups, which will create different pricing for different situations. If you want an item to be priced differently for different groups, be sure to create a separate Item Price for each group. Note that an Item Price with an Effective Date which is inactive will not show up in the Item Prices list unless the "Show All Prices" is checked.
When you have filled in the fields as needed, click Save to add the Item Price to the list, or Cancel to close the window without saving.
| Important! | Fields marked with * are required; you will not be able to continue until all required fields have been filled. |
In the Item Prices section, click the icon to edit an existing Item Price. Clicking the Edit icon will open the Edit Sales Item Price window. This window functions the same way as Add New Sales Item Price; make the necessary changes, and then click Save to retain the changes or Cancel to close the window without saving.
| Field Name | Description |
|---|---|
| Effective Date Description | The name of the date range that will be used for the selected item. |
| Patron Type | The patron type to which the selected item price will apply. |
| Pricing Group | The patron group for which the selected Item Price will be applied. |
| Paid | The price of the selected item for patrons whose eligibility type is Paid. |
| Reduced | The price of the selected item for patrons whose eligibility type is Reduced. |
|
|
Open the Edit window for the selected item. |
|
|
Delete the selected item. A confirmation prompt will appear. |
After saving a new Sales Item, or when opening an existing Sales Item with the Edit Sales Item screen, the Advanced button will appear at the bottom of the page. Clicking Advanced will create a new section called Item Details.

Use this section to create Item Details for the Sales Item. You can set the item to Include Milk for certain Patron Types, and you can also set an Effective Date and an Expiration Date. Clicking the icon opens the Edit Sales Item Detail window.
| Field Name | Description |
|---|---|
| Description | The name of the sale item as it will appear on most lists. |
| Patron Type | The patron type to which the selected item price will apply. |
| Includes Milk | Indicates that the selected item includes milk at no extra charge. |
| Effective Date | The first effective date of the selected item's date range. |
| Expiration Date | The last effective date of the selected item's date range. |
|
|
Open the Edit window for the selected item. |
|
|
Delete the selected item. A confirmation prompt will appear. |

|
Opens additional options for viewing details for the selected item. |

Fill in the required fields, and then click Save to save the changes or Cancel to close the window without saving.
| Important! | Fields marked with * are required; you will not be able to continue until all required fields have been filled. |
From the Item Details section, you can also click Add New to open the Add New Sales Item Detail window and create a new Item Detail. This window is otherwise identical to the Edit Sales Item Detail window.
| Field Name | Description |
|---|---|
| Description | The name of the sale item as it will appear on most lists. |
| Patron Type | The patron type to which the selected item price will apply. |
| Includes Milk | Indicates that the selected item includes milk at no extra charge. |
| Effective Date | The first effective date of the selected item's date range. |
| Expiration Date | The last effective date of the selected item's date range. |
In the Item Details section, click the icon to expand the section as shown below:
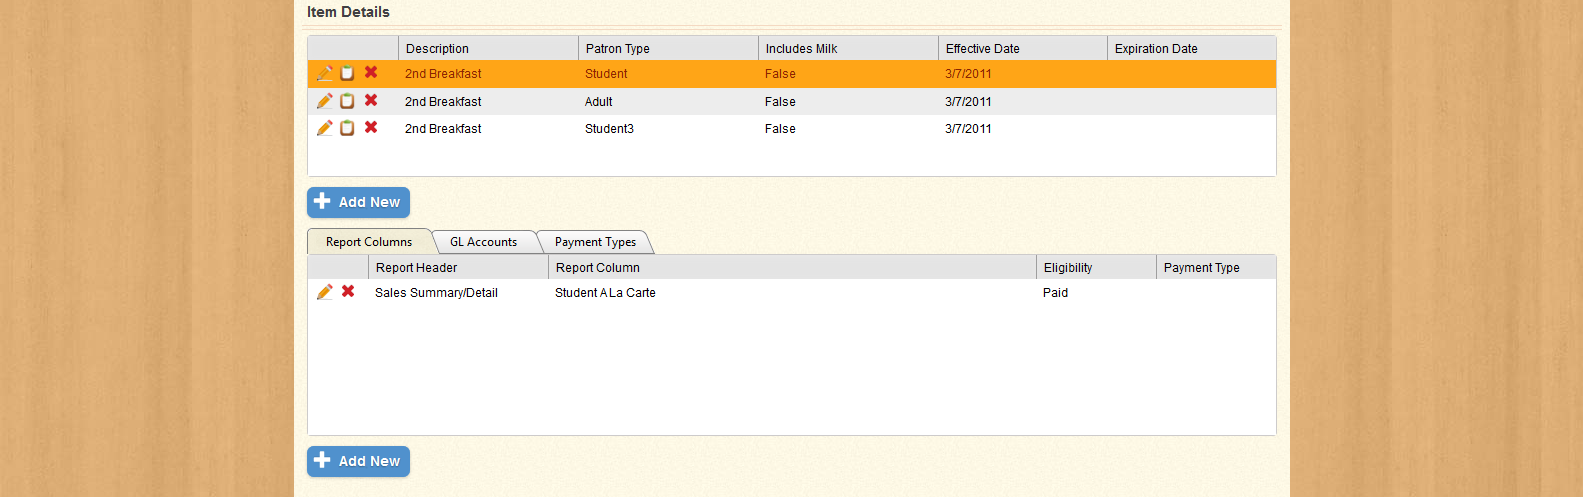
Click on the tabs to access Report Columns, GL Accounts, and Payment Types.
The Report Columns tab allows you to change the Report in which the Sales Item will appear for specific Payment Types and Eligibility. You can also select in which column the Sales Item will appear. The Report Columns tab appears as shown below:

You can sort the list by Report header, Report Column, Eligibility, or Payment Type by clicking the header in each column. You can also Edit or Delete an item by clicking the or icons in the first column. Click Add New to create a new Report Detail.
Clicking Add New or Edit will open a new window:
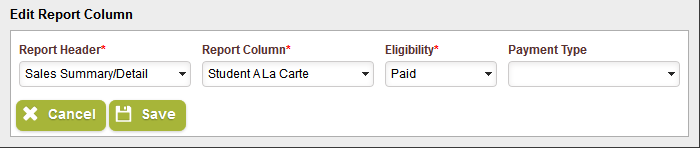
Select a Report, Column, Eligibility, and Payment Type; when you have filled in the required fields, click Save to retain the information, or Cancel to close the window without saving.
| Important! | Fields marked with * are required; you will not be able to continue until all required fields have been filled. |
| Field Name | Description |
|---|---|
| Report Header | The name of the report on which the selected item's sales will be displayed and calculated. |
| Report Column | The column into which the selected item's sales will be reported. |
| Eligibility | Indicates the eligibility type for which the selected item pricing will apply. |
| Payment Type | Displays acceptable forms of payment for the selected item. |
|
|
Open the Edit window for the selected item. |
|
|
Delete the selected item. A confirmation prompt will appear. |
Use the GL Accounts tab to add General Ledger account numbers to the Sales Item.

You can sort the list by Account Number or Eligibility. Click Add New to add an account number for a specific Eligibility.
When you click the Add New button, a window will appear as shown below:
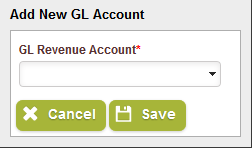
Select a GL Revenue Account and an applicable Eligibility type. When you have filled in both fields, click Save to add the Account to the list, or Cancel to close the window without saving.
| Important! | Fields marked with * are required; you will not be able to continue until all required fields have been filled. |
| Field Name | Description |
|---|---|
| GL Account | The General Ledger account to which the selected item will be reported. |
| Eligibility | Indicates the eligibility type for which the selected item pricing will apply. |
|
|
Delete the selected item. A confirmation prompt will appear. |
Use the Payment Types tab to add acceptable forms of payment to the item. The tab is shown below:

If there are no items in the list, the default payment types for the item will be set to Cash and Prepay. Click Add New to specify one or more acceptable payment types.
When you click Add New, a window will appear as shown below:
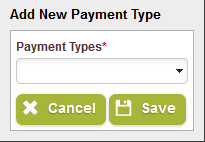
Select a Payment Type, and click Save to add it to the list. Click Cancel to close the window without saving.
| Important! | Fields marked with * are required; you will not be able to continue until all required fields have been filled. |
| Field Name | Description |
|---|---|
| Payment Type | Displays acceptable forms of payment for the selected item. |
|
|
Delete the selected item. A confirmation prompt will appear. |
 Tip: Transferring Items from Source to Destination
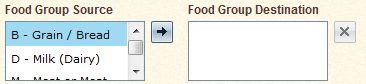
 icon.
icon.